Nikon's Lossy Data Compression
Introduction
The purpose of this web page is to document the coloured concentric rings caused by Nikon's lossy data compression. But first here is a brief introduction to the coloured concentric ring problems on Nikon cameras.
What are the Nikon concentric rings?
Nikon cameras suffer from two different concentric coloured ring issues:
- Rings caused by Nikon's lossy data compression, which appear to be the result of a badly implemented algorithm
- Rings caused by Nikon's hardcoded correction applied to the image, which is probably a colour shading correction
There is no complete solution to the rings caused by the hardcoded image correction and the only workaround is to ensure all exposures have the back-of-camera histogram further right than is typically recommended for astrophotography. Here's a link to a separate page discussing the hardcoded correction issue.
This web page will look in more detail at the lossy compression issue.
Background
Deep-sky astrophotography typically stacks together (i.e. averages) many exposures in order to reduce the background noise, allowing the faintest structures to be made visible.
Unfortunately this processing will also reveal faint artifacts that have been introduced by any raw-processing performed by the camera firmware,
if those artifacts are in the same position in every exposure.
For many years there has been anecdotal evidence of a "ring" problems at low ISOs on Nikon cameras but I first encountered it on a Nikon D5300 that I was proposing to use as a backup camera. I started a Cloudy Nights thread to discuss the issue (see list of links below) and during that discussion it became possible to isolate the problem to Nikon's lossy compression.
Since then it has been possible to prove that the issue affects the lossy compression on every Nikon camera. So avoid lossy compression if your camera gives you the option.
This discussion will mainly centre around the Nikon D5300 since this is the camera I've used for most experimentation.
Evidence for the problem
The easiest way to demonstrate the problem is to use a low ISO to take a sequence of out-of-focus images a uniformly lit surface
at various shutter speeds from severely undeexposed to slightly overexposed while keeping the aperture setting the same. I've done that here and created a montage:
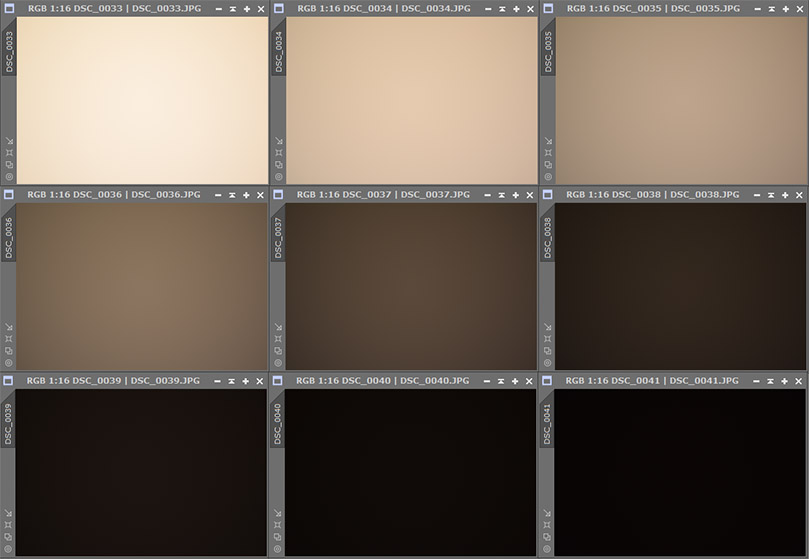
Click on image for larger version
Going from top left to bottom right, each exposure is half the previous one. The exposure in the middle of the 3x3 montage has its back-of-camera histogram peak 1/4 from the left which is a typical recommendation for shooting so-called light frames (i.e. night-sky exposures). The above shots are the out-of-camera JPGs but for the rest of the analysis I use the raw NEF files.
The montage below uses the same exposures as above but divides each exposure by the top left one, in effect using the top left exposure as a calibrating flat frame.
Each exposure was debayered, bias subtracted and then binned 8x8 to reduce resolution and noise. All this was done using floating point representation to avoid introducing new artifacts. Each image was then divided by the top left one and contrast enhanced to reveal the coloured rings that so frequently occur in stacked astro-images:
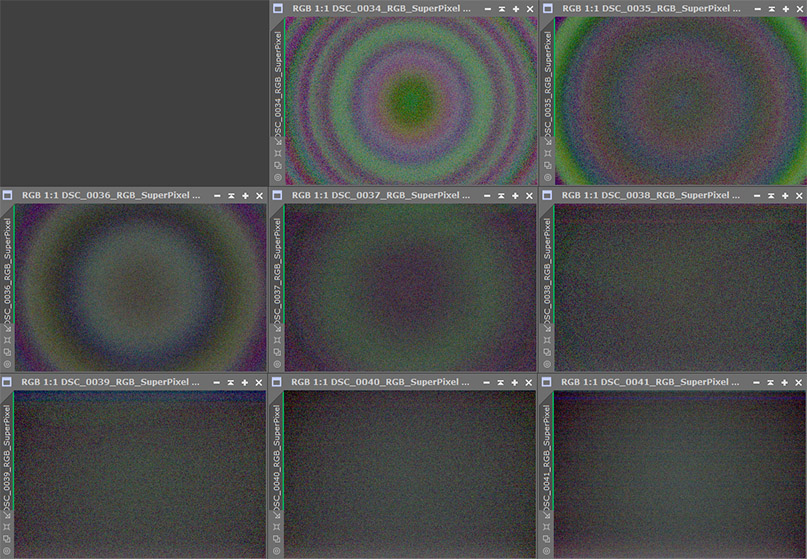
Click on image for larger version
For the avoidance of doubt, the rings occur at all ISOs but they are not so obvious at higher ISOs because they are partly hidden by shot noise.
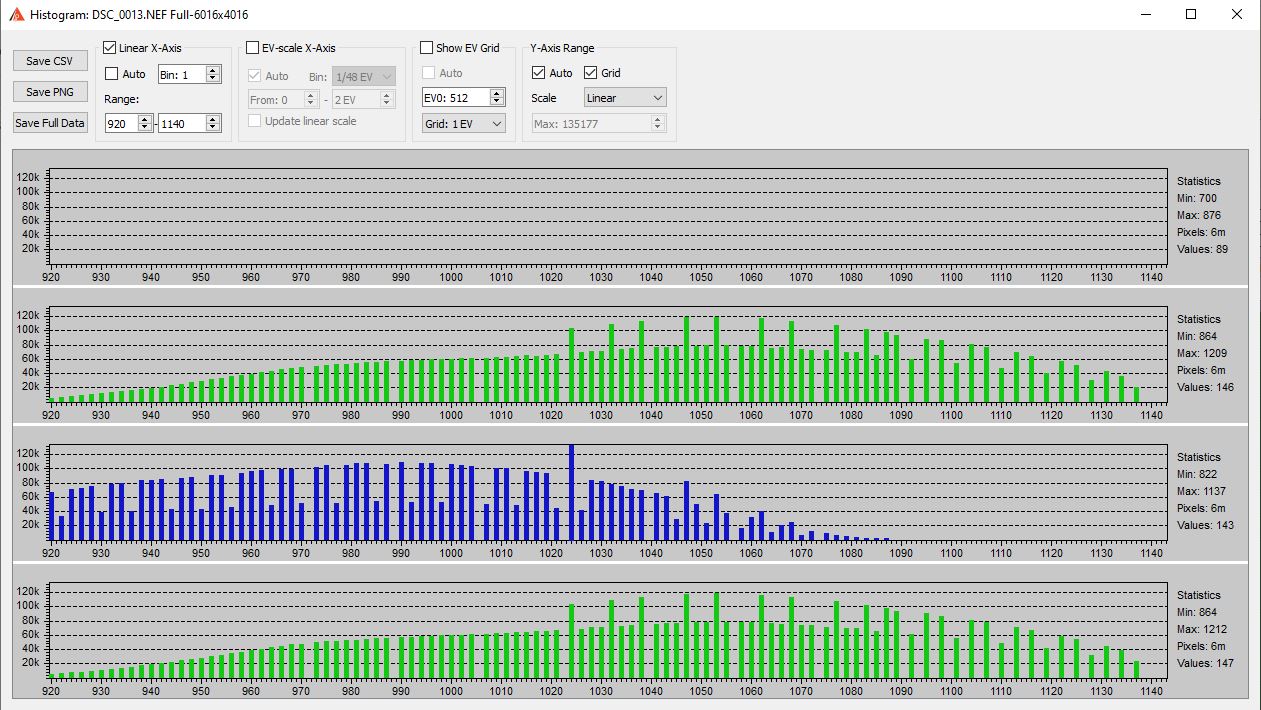
The first clue to the cause of the rings came from looking at the RawDigger histogram
Click on image for larger version
The large scale peaks and troughs in the green channel was a clue that something strange was going on. I'd never previously seen compressed data with those kind of irregular features. Closely spaced regular histogram gaps in the blue and red channels also showed that these channels were being digitally scaled. So further analysis was restricted to the green channel.
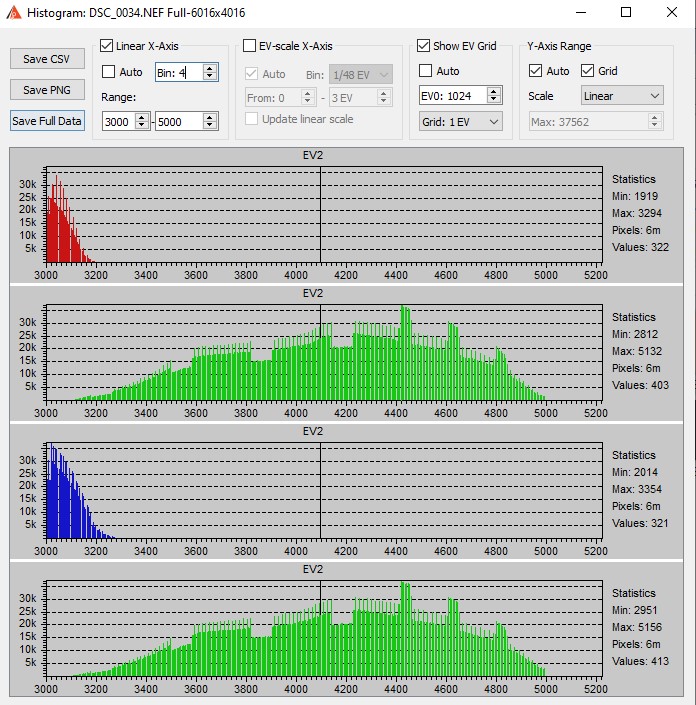
Here is the histogram from another exposure of a uniformly lit target:
Click on image for larger version
Ignoring the blue channel, which has the additional digital scaling applied, the green channel is showing the region of the histogram where the compression changes from taking every 2nd value to where it starts taking every 3rd value. This is normal behaviour for a lossy compression algorithm. As values increase it is only necessary to take every 2nd, then every 3rd, then every 4th value. The compression algorithm will bucket adjacent values together. In this region of the green histogram, the shorter spikes are where 2 values have been bucketed together and the taller spikes are where 3 values have been bucketed together.
For an unbiased compression algorithm, in the decompressed data, the "bucket 2" values should have a gap of 2 from the previous value and the "bucket 3" values should have a gap of 3 from the previous value. Unfortunately this is not the case for the Nikon algorithm.
The difference between the bucket gaps and bucket heights can be accumulated as a running sum and it gives rise to this very strange plot for the Nikon D5300:
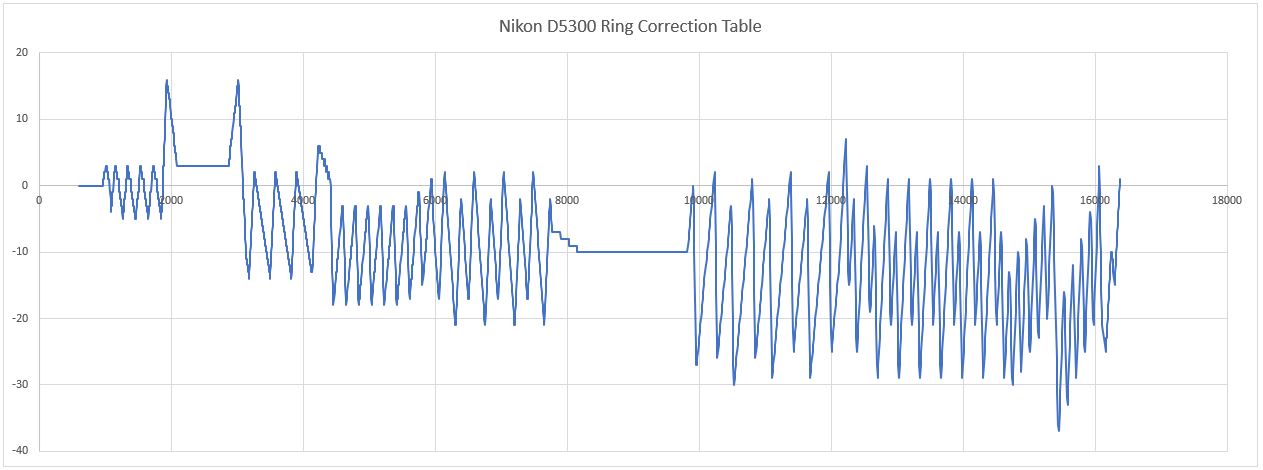
Click on image for larger version
In effect, the plot is showing the difference in value between the original value and the value that results from the compression/de-compression round trip. Each of the peaks and troughs in the chart are the biases in the data values causing the concentric ring patterns that plague astrophotographers.
How to avoid the lossy compression rings
The obvious way to avoid the rings caused by Nikon's lossy data compression is to switch the camera to lossless compression. However, only the more recent cameras allow this.
For cameras that don't have the possibility of lossless compression, the alternative is to change shooting strategy. As demonstrated in the histogram above, the differences between the bucket heights and bucket gaps begins to occur when the first histogram gap of 3 takes place in the green channel. For the Nikon D5300 this occurs at a (non bias-subtracted) value of 973 when shooting 14-bit data. If you choose a shooting strategy (i.e. a combination of ISO, focal ratio and exposure length) that ensures the the values in the background sky for all 3 colour channels of the D5300 are below 973 then no lossy compression rings will occur. The same restriction applies to flat frames used for calibration.
However, this "magic value" of 973 applies only to the D5300 and a few other cameras because different Nikon cameras use different lossy compression tables. The different compression tables are listed here at the PhotonsToPhotons website. Click on the table relevant to your camera (and bit depth) and search for the first gap of 3 in the values.
Here is a table of where the first gap of 3 occurs for some common models that don't support lossless compression:
First gap of 3 at value 973: D5100/D5200/D5300 in 14-bit mode
First gap of 3 at value 2125: D5500/D5600 in 14-bit mode
First gap of 3 at value 256: D3100/D3200/D3300/D5000/D5100/D5200/D5300 in 12-bit mode
First gap of 3 at value 541: D5500/D5600 in 12-bit mode
How to repair the lossy compression rings
A major breakthrough took place when I noticed that NEF files converted to DNG by Adobe's DNG converter contain the original compressed NEF data.
It then became possible to write a piece of Windows software that takes a DNG file, decompresses it and then writes a new DNG file that has been repaired with the tables of corrections I painstakingly generated.
Here is the zip file containing the software.
For those who are (rightly) suspicious of downloading software from the internet or who are interested in the code, perhaps to build it on non-Windows machines, the source code and "Visual Studio Express 2013 for Desktop" project files can be downloaded in this zip.
It should work with the following camera file formats:
D5100/D5200/D5300 14-bit and 12-bit
D500 14-bit and 12-bit
D600/D610 14-bit and 12-bit
D7000/D7100/D7500 14-bit and 12-bit
D3S/D3X 14-bit and 12-bit
D4 14-bit and 12-bit
D800/D800E/D850/Df 14-bit and 12-bit
D5500/D5600 14-bit
D7200 14-bit
D750/D810 14-bit
D3100/D3200/D3300 12-bit
D5000 12-bit
1 V1/1 J1 12-bit
Be sure to read the ReadMe.txt file enclosed in the zip file for instructions and other information. It will be necessary to download Adobe's DNG converter from here if you don't already have it.
Here's a screenshot of the Ring Removal tool in action:
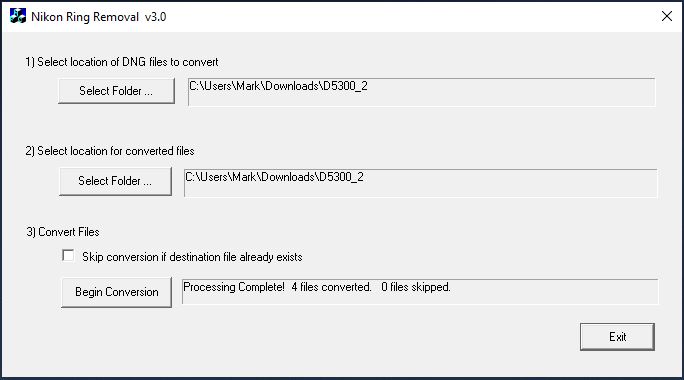
Click on image for larger version
This is not a perfect solution but it works very well in most cases.
As as example of what it can achieve, I shot two raw NEF flat frames with the D5300 against the dusk sky (i.e. sky flats). One had the back-of-camera histogram peak 1/4 from the left. The other had the back-of-camera histogram peak mid-way. Both files had raw values well above 973 and so both files contained embedded rings caused by the lossy data compression.
Debayering, subtracting bias, dividing one by the other (all steps in floating point) and then enhancing contrast gave the following result with very obvious coloured rings:
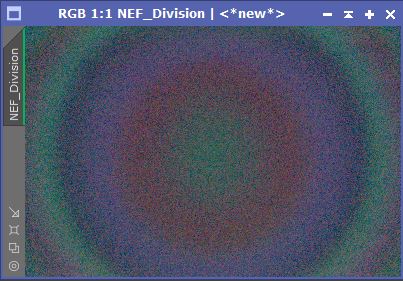
Performing the same operations on the DNG files repaired by the Ring Removal tool gave this result:
Conclusion
Deep-sky astrophotography is adversely affected by concentric ring artifacts that have been unintentionally introduced into the data by the Nikon's faulty lossy data compression.
Fortunately, careful shooting strategies or the Ring Removal tool can mitigate these problems.
I can't recommend Nikon cameras for serious deep-sky astrophotography mainly because of the concentric rings issue caused by the hardcoded image correction that cannot be disabled.
However, as always, it's very much an individual's decision whether or not this is likely to affect their own photographic goals.
Other Useful Links
Lossy compression investigation on Cloudy Nights forum
Technical discussion on DPReview forum
PhotonsToPhotos NEF compression tables
Rings caused by the Nikon hardcoded image correction
Last updated by Mark Shelley: 15 March 2023 (astro@markshelley.co.uk)